NVision Now Offering Product Defect Analysis
14th June 2011
Source:
NVision, Inc
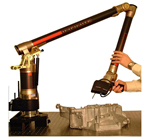
NVision, Inc.’s Engineering Service Division is now offering product defect analysis, which can potentially be introduced in product liability litigation to prove a manufacturer innocent of producing a defective or harmful product. The company has partnered with Materials Analysis, a Dallas-based engineering firm specializing in litigation support, to provide this service.
“Each year, thousands of product injury lawsuits are filed in the U.S. While it’s indisputable that the use of flawed products can result in injury to the consumer, it’s equally true that manufacturers are often sued for product “defects” that do not exist, or for defects that occurred after the product left the manufacturing facility,” says Steve Kersen, Vice President of Sales and Marketing for NVision. “The precise product geometry we provide with our non-contact scanning services can potentially rule out the theorized cause of an accident and clearly show whether or not an alleged defect actually existed.” Scanning also makes it possible to generate electronic solid models of product parts, which are much easier for non-technical people in a courtroom to visualize than blueprints.
To produce a product’s geometry, which will later be analyzed by Materials Analysis for possible defects, NVision uses its non-contact MAXOS measurement system and HandHeld Scanner. The HandHeld scanner is a portable device that is capable of capturing 3D geometry from components of virtually any size. It is attached to a mechanical arm that moves about the object, freeing the user to capture data rapidly and with a high degree of resolution. The MAXOS uses a proprietary non-contact probe consisting of a concentrated light that collects individual points at a rate of 100 per second, many times faster than a CMM. The MAXOS provides accuracy of +/- 0.0002 and a resolution between measured points down to 0.00001.
NVision’s non-contact measurement and scanning technologies have already provided critical assistance in several product liability cases. In one case, it was necessary to inspect a product defect that had caused a critical component to break and cause an airplane to lose altitude and crash. If the defect was an inclusion in a casting it would indicate a manufacturing defect and would likely be shaped like a stringer or half-ellipse. However, if the defect was a corrosion pit that had occurred long after manufacturing, and had not been properly addressed when the aircraft was last serviced, it would likely be hemispherical in shape.
NVision’s Engineering Service Division examined the defect with the MAXOS and HandHeld Scanner and captured the defect’s complete geometry, then generated a point cloud consisting of the coordinates of individual points. The technicians used software that comes with the scanner to convert the point cloud to a polygon mesh. They then used reverse engineering software to convert the polygon data to a surface model. They exported the surface model in the STEP format and imported it into computer aided design (CAD) software where they converted it to a solid model.
The solid model clearly showed that the defect was hemispherical and was therefore caused by a servicing problem rather than a manufacturing defect. The manufacturer was thus able to avoid what would undoubtedly have been an expensive settlement. Said Mark Allen Lewis, Staff Engineer for Materials Analysis, “Frankly, NVision’s scanning results were almost magic!”
Similar articles
More from NVision, Inc
- NVision's Consulting and Engineering Services Improve Fracking Parts 4th November 2014
- Robots Blaze New Path for Glaze 16th April 2013
- NVision Launches New Project Portal for Clients 24th April 2012
- NVision Helps Reverse Engineer Optical Retailer's Store Display, Enabling Millions in Annual Sales 12th December 2011






Write a comment
No comments